
This post has been depricated and remains for historical purposes only. Please refer to -link coming soon- instead.

Backups, backups, backups!
Having recently recovering files from a crashed hard drive for family, I decided it was time to upgrade my backup solutions. Until now, my setup has included a myriad of tricks, including local copies, external drives, dropbox, cds, dvds, Crashplan, rsync and recently btsync.
What a pain! The main problem here, is consistency and automation. I need to simplify and centralize this process. Plus, I have been itching to get a new server setup. I haven’t had fun doing that in quite a few years.
Enter the server. A Pogoplug Series 4, running off a small usb thumbdrive, attached to a 4TB usb drive for storage. Next time I do this, I may skip the thumb drive because I am a bit worried about the durability, but then again, it was easy to set up and only $8. In fact, this is going to work out so well, lets get 2 sets, and keep one off site!
The equipment:
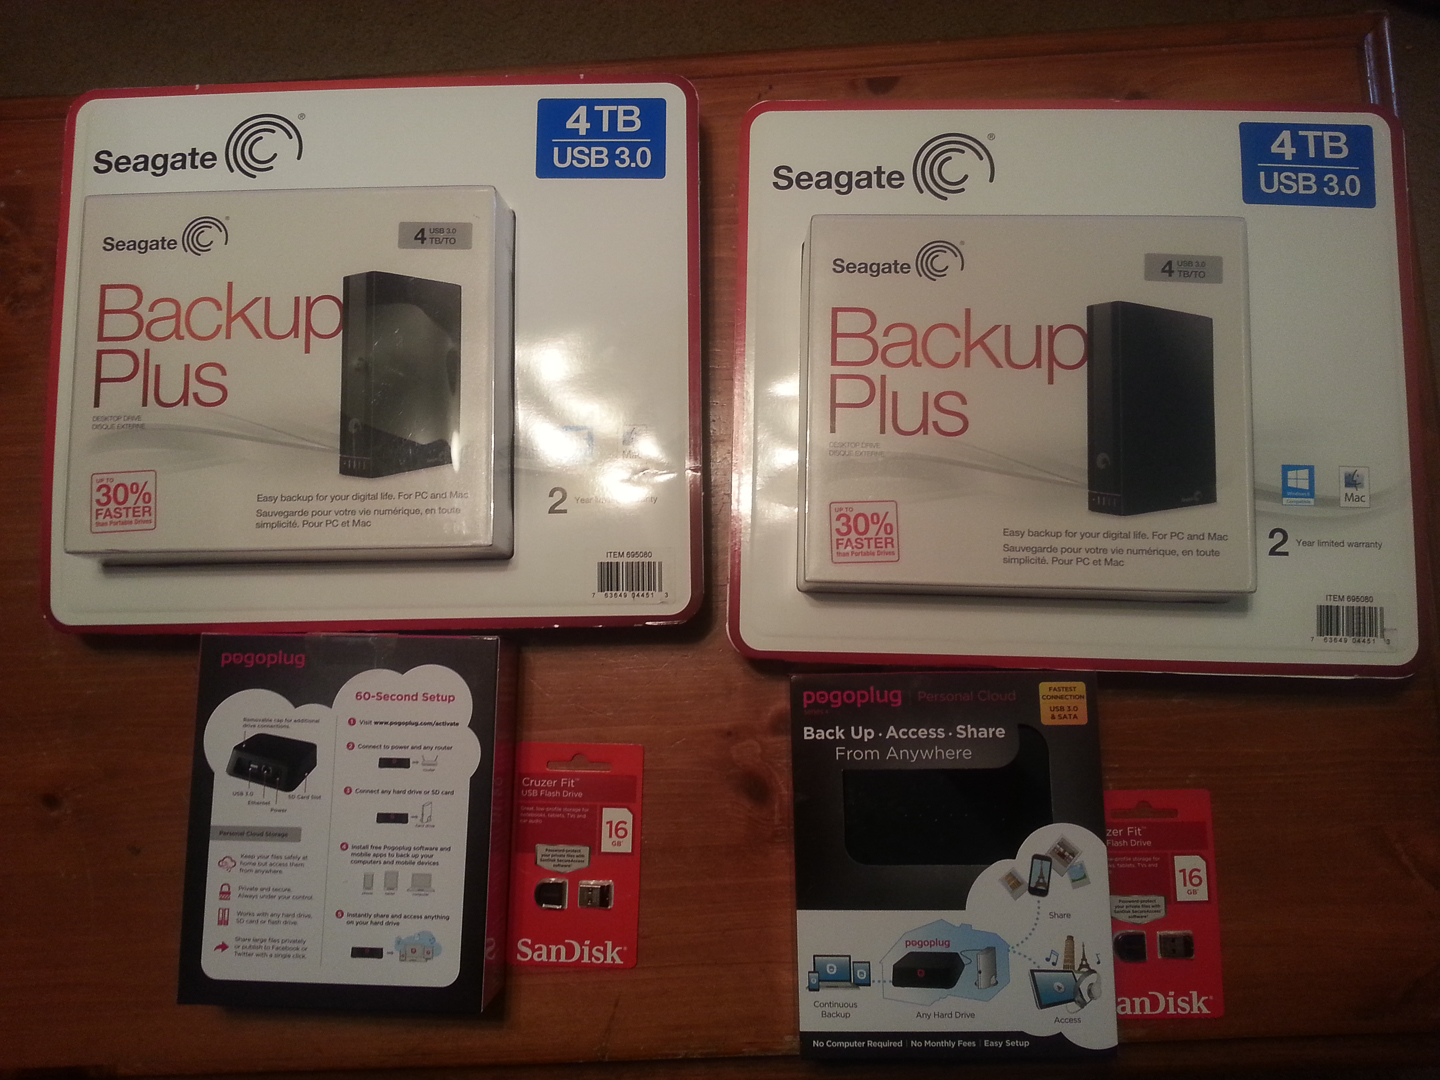
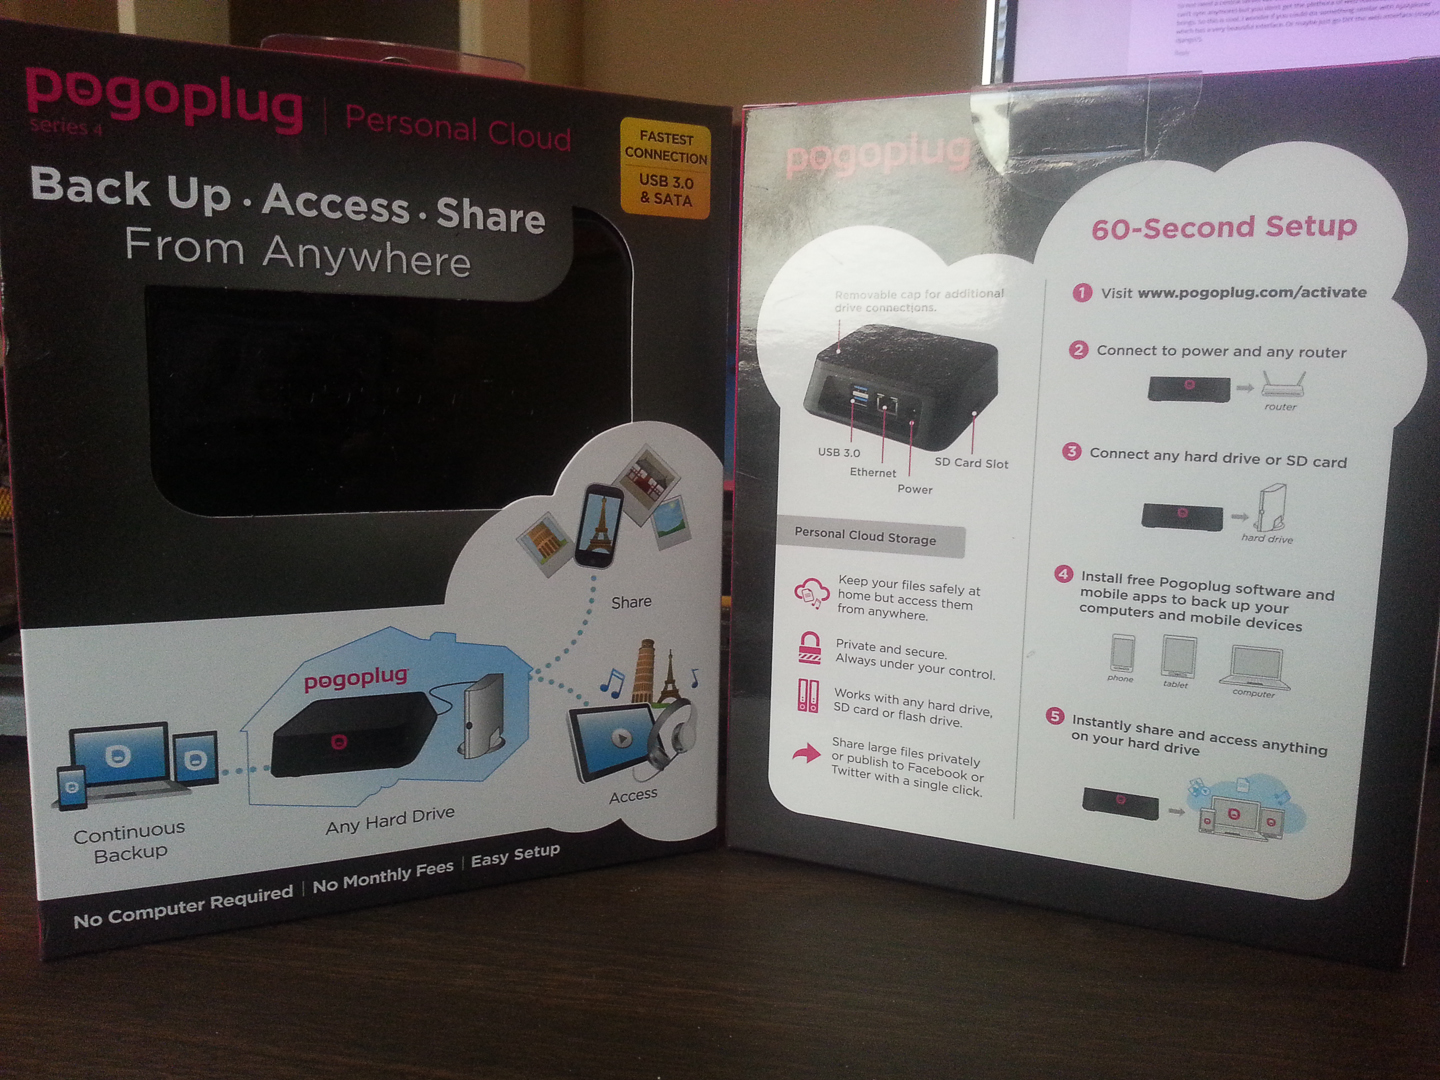
Pogoplug Series 4
Sandisk Cruzer Fit 16GB
- 2 usb thumb drives: SanDisk Cruzer Fit 8GB thumb drives. (4GB should be more than enough) (from Adorama)
- 2 usb hard drives: Seagate Backup Plus 4TB. (from Costco)
- 2 pogoplugs: Pogoplug Series 4 (from Adorama) note: I have heard the older E02 model is preferable, but that one is getting to be a gamble to locate and the Series 4 has performed just fine for my needs.

Sandisk Cruzer Fit 16GB
The process
So let’s get started. (Oh yeah, doing this will void your warranty. Be careful and go slowly. Obligatory disclaimer: everything you do is at your own risk, risk, risk, risk, risk. [eerie echo] )
The first thing we need to do is get rid of the preinstalled system and install Arch Linux. You can also get Debian on these things. This is a relatively straight forward process. For the updated files and instructions, please refer to http://archlinuxarm.org/platforms/armv5/pogoplug-series-4. I won’t put in all the commands here, just follow the instructions written by the pros.
Summary of events (following instructions at above link):
- Start up pogoplug.
- Enable SSH
- Log in with SSH and disable pogoplug services
- Format thumb drive, download and install Arch Linux.
- Download and run the U-boot installer.
- Reboot. SSH back in with the user/pass of root/root.
AND WE ARE IN!
Welcome to your brand spanking new, shiny linux server.
We want this to be a secure endeavor, so before we even start updating packages, we want to at least set up a system password.
#reset root password
passwd
Now we want to update our system to get us started on stable ground.
#update system and install some packages
#press Y when asked about replacing linux with linux-kirkwood
pacman -Sy linux-kirkwood linux-kirkwood-headers ntp yaourt base-devel nano wget

Time
The Pogoplug doesn’t have a hardware clock, so you will need to reset the time for each boot
#if you need to list available timezones
timedatectl list-timezones

#set your timezone
timedatectl set-timezone America/New_York
#autostart
systemctl enable ntpd
systemctl start ntpd

#update time after network start
echo "ExecUpPost='/usr/bin/ntpdate -u pool.ntp.org'" >> /etc/netctl/eth0
Labels and Users
#add ROOTFS label to fstab
echo "LABEL=ROOTFS / ext3 rw,noatime 0 1" >> /etc/fstab
#set hostname
hostnamectl set-hostname pogoplug

#create a new user (named whatever you like)
useradd joe
mkdir /home/joe
mkdir /home/joe/.ssh
chmod 700 /home/joe/.ssh
passwd joe

#add new user to sudoers
visudo
#find root ALL=(ALL) ALL
#copy underneath it
joe ALL=(ALL) ALL

#it's about time to reboot and log back in with your new user
reboot
Log in with your new user (joe) and make sure you can sudo su without error, then, lock down ssh root logins
nano /etc/ssh/sshd_config

#find #PermitRootLogin yes
#and change to
PermitRootLogin no
Firewall
iptables
#check to see if you have any rules set
iptables -nvL --line-numbers
You should get something like
Chain INPUT (policy ACCEPT  86 packets, 10854 bytes)
num   pkts bytes target     prot opt in     out     source               destination

Chain FORWARD (policy ACCEPT 0 packets, 0 bytes)
num   pkts bytes target     prot opt in     out     source               destination

Chain OUTPUT (policy ACCEPT 5 packets, 988 bytes)
num   pkts bytes target     prot opt in     out     source               destination
If there are rules, you can check out how to flush iptables.
#set up our user defined chains.  this is where we will store our firewall exceptions.
iptables -N TCP
iptables -N UDP
#TCP and UDP are the names, use can use anything you want, but for simplicity's sake we are naming them after the protocols we will apply to each chain

#since we are not setting up a gateway
iptables -P FORWARD DROP
#we don't want to filter out anything being sent from our pogo so...
iptables -P OUTPUT ACCEPT

#allow established connections, and new traffic related to establish connections
iptables -A INPUT -m conntrack --ctstate RELATED,ESTABLISHED -j ACCEPT
#allow loopback connections
iptables -A INPUT -i lo -j ACCEPT
#drop packets with invalid headers/checksums
#if you need ICMPv6 neighborhood discovery, prepend this rule with:
#iptables -A INPUT -p 41 -j ACCEPT
iptables -A INPUT -m conntrack --ctstate INVALID -j DROP
#accept new pings
iptables -A INPUT -p icmp --icmp-type 8 -m conntrack --ctstate NEW -j ACCEPT
#attach TCP and UDP chains to INPUT chain to handle incoming connections.  Once a connection is accepted, the RELATED/ESTBLISHED rule above will handle it
iptables -A INPUT -p udp -m conntrack --ctstate NEW -j UDP
iptables -A INPUT -p tcp --syn -m conntrack --ctstate NEW -j TCP
#reject tcp and udp connections for closed ports
iptables -A INPUT -p udp -j REJECT --reject-with icmp-port-unreachable
iptables -A INPUT -p tcp -j REJECT --reject-with tcp-rst
#reject remaining traffic for other protocols
iptables -A INPUT -j REJECT --reject-with icmp-proto-unreachable

#add exception for SSH before locking down the INPUT chain. We would get locked out of the pogo otherwise.
iptables -A TCP -p tcp --dport 22 -j ACCEPT

#lock down incoming
iptables -P INPUT DROP
Okay, so what we have done with our firewall so far is to set up 2 chains for user rules (UDP and TCP), locked down forwards and incoming (FORWARD and INPUT), opened up outgoing (OUTPUT), and punched a hole in the wall for SSH (via the TCP chain) so we don’t lock ourselves out of the pogo. Now we need to open up only the ports we need, and the rest remain blocked/dropped.
#save
iptables-save > /etc/iptables/iptables.rules
#if you haven't already
systemctl enable iptables
systemctl start iptables
#otherwise
systemctl reload iptables
For more information on iptables and statefull firewalls, check out https://wiki.archlinux.org/index.php/Simple_stateful_firewall and http://www.thegeekstuff.com/2011/06/iptables-rules-examples/.
This is a multipart post:
- Part 1 << you are here
- Part 2 – coming soon
- Part 3 – coming soon
Posted (partially) from WordPress for Android
Leave a Reply